Showing posts with label Tutorial. Show all posts

Monday, January 7, 2013

Resolution Embroidery Tutorial

I haven't posted for a while because I've been learning a new CRAFT!  Oh such fun and joy with learning something new, and get my craft on.  Machine Embroidery now obsesses me.  A couple of bags I made this weekend, and one tutorial on a bag made last week.  Enjoy!


I've learned much from cyber-world, and so here's my contribution:  Resolution Tote Bag


Step 1:  Purchase blank canvas tote.  I use Online Discount Clothing: The Deal Rack website to purchase a variety of weights and styles.  This bagis BAGedge 12 oz with contrasting handles BE010, on sale for $3.31 each.  I've also embroidered on the 10 oz bag (great value), and the heavy 16 0z boat tote (similar to Land's End big bag).
Tote Bag
Made of 100 percent cotton canvas, the natural body comes in contrasting nylon webbing handles in 7 great colors. The bag measures 11.25"W x 14.5"H x 3"D.
Manufacturer Product ID: BAGedge BE010
Step 2:  Create Design
My go-to favorite site is Urban Threads
Their contemporary designs inspire, motivate, and obsess me!  Purchasing their designs is quick and easy (too easy).  My machine only stitches 4" x 4" designs in PES format, so I am limited to the smallest designs.  Cost: $3.00.

This design called Resolutions is perfect for a New Year's bag, reminding me to do the following:
Step 3:  Choose threads.  I line them up in front of the machine so I can see them together, and they are ready to go when I need them.  Designs will Download design into design software. I use Essentials Embrilliance.
This inexpensive (compared to others) software, $139, allows you to use your Mac or Windows PC to merge embroidery designs, resize, colorize, add lettering, group/ungroup, and save in your machine's format.  It took a while to figure out, but was worth the time spent. More on this program in future tutorial.

Step 4:  Save on flash drive and upload to machine and transfer to machine.  BTW, I'm using a Brother Innovis 950 D Embroidery and Sewing Machine (entry level machine). I will upgrade to a machine with larger hoops as soon as possible!  Perhaps another resolution!


Step 5:  Hoop Garment
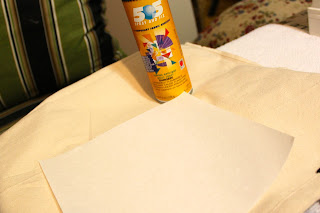
I use 505 adhesive spray to attach a tear away stabilizer sheet that will also be hooped.
 Hoop stabilizer and fabric as tightly as you can. Tighten with screw on end of the hoop.


Step 6:  Attach hoop to machine. Lock in place.  If you need to change bobbins while embroidering, no problem. You unhoop from machine, but the embroidery unit stays in place so after changing the bobbin, you can easily rehoop the garmet to the unit and you're still in the exact same place!

Step 7:  Choose design.


Ready.  Stitch. Change colors as indicted when machine stops.  Don't walk away from the machine. You need to be watching for a variety of issues.   Tutorial to follow, but stuff happens, and you need to be there to trouble shoot. I've had the needle break, fall out, catch the garmet, thread break and the bobbin jam up.  Sometimes the machine will tell you what to do and sometimes, you have to figure it out on your own.  I've learned a lot.

Cut threads as you sew/embroider because the threads are harder to cut later after they have been stitched over while completing the design.


 Step 8:  Finished stitching!  Unhoop from embroidery unit.

Step 9:  Tear Away Stabalizer (or cut away).


Step 10:  Trim threads from front and back.


Step 11:  Iron. A good steam iron is essential to remove the hoop marks and to give a professional finish to the project.

And that's it.  This project took apx. 1.5 hours to complete.  It follows one of the resolutions, "Be Creative Every Day."

Some of the other bags I made for gifts this year:


I'm posting on Metamorphosis Monday!  Join me and check out all the innovative DIY's!

Happy Monday to all.

~CJ

Saturday, April 14, 2012

Blue Willow Linens Tutorial

Every night my mom drank one cup of coffee out of a Blue Willow transferware mug as she corrected papers from her day as a first grade teacher. 'The children need them back the next day so they can learn," she said.  Whenever I saw that mug, it reminded me of my mom's dedication and professionalism as a teacher.  How did she stay up so late? I wondered.  Now I know.  Coffee.
Flash forward fifty years....
Knowing I am now a dishaholic, Mom gives me a bag containing the Blue Willow coffee mug, and a few other pieces that she still had from that old set. My imagination was off, planning a table to highlight the pieces, Mom, and all teachers (grandiose visions indeed).  At the Rose Bowl Flea Market, I found some Johnson Brothers Asiatic Pheasant plates and soup bowls.  The Dollar Store afforded me cobalt blue water goblets.  But I still didn't have the tablecloth foundation for the table I was planning in my head.  Everything seemed too old-fashioned, too stuffy, too unlike the innovative classroom projects Mom had invented and graded all those years ago.

Then I found two remnants of denim that would pair perfectly for a square overskirt, adding texture, whimsey, and innovation to the table I envisioned.

Here is the tutorial for making the square overskirt, denim napkin rings, and polka dot napkins.


Trim main fabric so that the length equals the width.  My fabric was 48 X 48 inches.  Set aside.  
 I use roller cutter and mat when I'm cutting straight lines.  More precise. TIP:  Always close blade when not using.
 Cut four strips of border fabric 9 X 51 inches.  Press 1/2 inch of long edges to wrong side.  At the end of each strip mark 1/2 inch from the midpoint. At each folded edge make a mark 4 inches from the end.  Draw two lines connecting the marks to form a 9- degree angle.


Pin the end of one strip to the end of a second strip (right sides together).  Seam ends together following marked lines.   Repeat to sew all four strips together and create one piece.  Clip pointed edges. Press seams open.  Turn right side out.
Fold border in half aligning edges, and press to crease outer edge.  Lay pressed border on a flat surface. Sandwich main fabric between folds of border, and pin in place.  

 Topstitch through all layers close to the border edge.
Table cloth design and directions inspired by Southern Living Quick Fabric Decorating, 2002.

Napkin rings are my own design to use up extra fabric, and add some dots of white to the table.
Cut fabric 9 X  6 inches. Fold in half.  Sew right sides together on short and long side.  Turn right side out.  Turn open edge inside 1/2 inch, topsttich closed.  Make a button hold on one end. Sew a button on the other end.  Button close.  Napkin ring!
Needed fun wraps for my white napkins so found lightweight fabric with polka dots.  Fun! Another project.  Cut napkin fabric 17 x 17 inches. Edge using blanket stitch on your machine.  Trim edges carefully.  Use as wrap for outside of heavier napkin. 


More on the table, "Fun with Dick and Jane" later this week.  Hope your weekend is filled with crafts, dreams, and creations.  It is rest for the soul.

Tuesday, April 10, 2012

Create Space #3 Shelf Tutorial

Spring Vacation affords me the time to shop daily in the treasure trove stores I love, like Home Goods.  Today while "working out" (wear a pedometer so steps count), I happened upon a doll like the one in Susan's Between Naps on the Porch replica Santos.  OK, mine is much more modern but with a sweet face, green dress, and holding a baby bird, my favorites.  Love her. Just the addition my desk needed. She sits next to a shelf I put together to hold mason jars of sewing supplies.  So here's the shelf tutorial, inspired by my girl, name to be decided when it comes to me.  BTW, doll $14.99, shelf apx. $17.  Lovely.

I wanted a shelf that would keep the sewing supplies within reach, but not take up too much room. At least for me, if stuff isn't within reach, the project gets put off.  I have been searching for a suitable shelf, willing to pay just about anything, but still couldn't find it.  I was starting to look at medicine cabinets to mount on the wall or sit on the desk, but they were too deep.  Then I found these unpainted craft crates at Michael's, $3 each.  Done.
Purchased one can spray paint flat black $4.75.  The inspiration signs were also purchased for a couple of dollars from Michael's I couldn't find large letters to paint, as I had planned.  There are never any "C" letters left.  Someday.
Spray in well vented and protected area.  Outside patio table covered with leftover plywood (husband project). Layer spray paint slowly so as not to streak, and turn crates often to get into the corners.
The white words took more time and paint than I imagined.  Patience is a virtue.
Allow to dry four hours, stack and instant shelf. I was going to nail together, but changed my mind so that I can switch them out if I want to later. My tissue box fit perfectly, with the tissue coming up between the slates!  Perfection.
It wasn't rocket science, but it solved the shelf equation for me.  Happy Crafting!  Feel free to recommend names for my girl.  Love her, and having a Create Space of my very own!

Saturday, March 24, 2012

Free People Lace Scarf Tutorial


Now that my "Create Space" room is mostly complete, I've challenged myself to create something at least once a week.  I don't have much time this week because I'm preparing to go to another school for their WASC visit, so I need to shop, buy some boots, and a few updated accessories.  While I'm out shopping, I see an adorable scarf  at Free People, $48.  The scarf below is not the one I saw but it is similar. The one I saw was made with three pieces of old lace, sewn together to create a whimsical, vintage, hippie look that I loved.  Thinking to myself, "I have old lace that I bought on eBay a while ago to make into napkins. You could make this."

When I got home, there in my linen box were the three pieces of lace.  Beautiful three pieces apx. 60" each piece.  So here's what I did:

Measured width of lace so that I had an end piece wide enough to sew on top. Carefully cut it out, going around the lace pattern.


I finished the edges with a serge stitch, No. 8 on my sewing machine.
Then, put the pieces together and stitched on top, again serge stitch No. 8.


Super easy, finished scarf!


So that's it for Create Space weekend project.  And it didn't cost a dime.

Happy creating!

~CJ