Showing posts with label Projects. Show all posts

Saturday, June 23, 2012

Garden Metamorphosis

What do you get when you combine hard work, plants, water, and lots of sunshine?  A garden that would make Michelle Obama proud!


The Foss Farm/Garden metamorphosis has been an ongoing project, but really ramped up Memorial weekend, when we transformed a spa deck into raised bed planters.  We couldn't be more thrilled with our decision.  The spa had been well-used, but we really wanted raised bed planters, so our son offered to take the spa off our hands so we were off!


Break up the hard dirt

 Recycled the deck wood to make three planters
 Lined with plastic, filled with magical planting mix (recipe below)

Added drip system, then plants


Add water, sunshine, weeding as needed


Blueberry picking in the rose garden


I'm linking up with these wonderful parties
Serenity Saturday
Metamorphosis Monday
Seasonal Sundays


Please leave me a comment.  I love to hear from you, and read about what you are up to as well.

Happy Summer!
~CJ

Saturday, April 14, 2012

Blue Willow Linens Tutorial

Every night my mom drank one cup of coffee out of a Blue Willow transferware mug as she corrected papers from her day as a first grade teacher. 'The children need them back the next day so they can learn," she said.  Whenever I saw that mug, it reminded me of my mom's dedication and professionalism as a teacher.  How did she stay up so late? I wondered.  Now I know.  Coffee.
Flash forward fifty years....
Knowing I am now a dishaholic, Mom gives me a bag containing the Blue Willow coffee mug, and a few other pieces that she still had from that old set. My imagination was off, planning a table to highlight the pieces, Mom, and all teachers (grandiose visions indeed).  At the Rose Bowl Flea Market, I found some Johnson Brothers Asiatic Pheasant plates and soup bowls.  The Dollar Store afforded me cobalt blue water goblets.  But I still didn't have the tablecloth foundation for the table I was planning in my head.  Everything seemed too old-fashioned, too stuffy, too unlike the innovative classroom projects Mom had invented and graded all those years ago.

Then I found two remnants of denim that would pair perfectly for a square overskirt, adding texture, whimsey, and innovation to the table I envisioned.

Here is the tutorial for making the square overskirt, denim napkin rings, and polka dot napkins.


Trim main fabric so that the length equals the width.  My fabric was 48 X 48 inches.  Set aside.  
 I use roller cutter and mat when I'm cutting straight lines.  More precise. TIP:  Always close blade when not using.
 Cut four strips of border fabric 9 X 51 inches.  Press 1/2 inch of long edges to wrong side.  At the end of each strip mark 1/2 inch from the midpoint. At each folded edge make a mark 4 inches from the end.  Draw two lines connecting the marks to form a 9- degree angle.


Pin the end of one strip to the end of a second strip (right sides together).  Seam ends together following marked lines.   Repeat to sew all four strips together and create one piece.  Clip pointed edges. Press seams open.  Turn right side out.
Fold border in half aligning edges, and press to crease outer edge.  Lay pressed border on a flat surface. Sandwich main fabric between folds of border, and pin in place.  

 Topstitch through all layers close to the border edge.
Table cloth design and directions inspired by Southern Living Quick Fabric Decorating, 2002.

Napkin rings are my own design to use up extra fabric, and add some dots of white to the table.
Cut fabric 9 X  6 inches. Fold in half.  Sew right sides together on short and long side.  Turn right side out.  Turn open edge inside 1/2 inch, topsttich closed.  Make a button hold on one end. Sew a button on the other end.  Button close.  Napkin ring!
Needed fun wraps for my white napkins so found lightweight fabric with polka dots.  Fun! Another project.  Cut napkin fabric 17 x 17 inches. Edge using blanket stitch on your machine.  Trim edges carefully.  Use as wrap for outside of heavier napkin. 


More on the table, "Fun with Dick and Jane" later this week.  Hope your weekend is filled with crafts, dreams, and creations.  It is rest for the soul.

Tuesday, April 10, 2012

Create Space #3 Shelf Tutorial

Spring Vacation affords me the time to shop daily in the treasure trove stores I love, like Home Goods.  Today while "working out" (wear a pedometer so steps count), I happened upon a doll like the one in Susan's Between Naps on the Porch replica Santos.  OK, mine is much more modern but with a sweet face, green dress, and holding a baby bird, my favorites.  Love her. Just the addition my desk needed. She sits next to a shelf I put together to hold mason jars of sewing supplies.  So here's the shelf tutorial, inspired by my girl, name to be decided when it comes to me.  BTW, doll $14.99, shelf apx. $17.  Lovely.

I wanted a shelf that would keep the sewing supplies within reach, but not take up too much room. At least for me, if stuff isn't within reach, the project gets put off.  I have been searching for a suitable shelf, willing to pay just about anything, but still couldn't find it.  I was starting to look at medicine cabinets to mount on the wall or sit on the desk, but they were too deep.  Then I found these unpainted craft crates at Michael's, $3 each.  Done.
Purchased one can spray paint flat black $4.75.  The inspiration signs were also purchased for a couple of dollars from Michael's I couldn't find large letters to paint, as I had planned.  There are never any "C" letters left.  Someday.
Spray in well vented and protected area.  Outside patio table covered with leftover plywood (husband project). Layer spray paint slowly so as not to streak, and turn crates often to get into the corners.
The white words took more time and paint than I imagined.  Patience is a virtue.
Allow to dry four hours, stack and instant shelf. I was going to nail together, but changed my mind so that I can switch them out if I want to later. My tissue box fit perfectly, with the tissue coming up between the slates!  Perfection.
It wasn't rocket science, but it solved the shelf equation for me.  Happy Crafting!  Feel free to recommend names for my girl.  Love her, and having a Create Space of my very own!

Saturday, March 24, 2012

Free People Lace Scarf Tutorial


Now that my "Create Space" room is mostly complete, I've challenged myself to create something at least once a week.  I don't have much time this week because I'm preparing to go to another school for their WASC visit, so I need to shop, buy some boots, and a few updated accessories.  While I'm out shopping, I see an adorable scarf  at Free People, $48.  The scarf below is not the one I saw but it is similar. The one I saw was made with three pieces of old lace, sewn together to create a whimsical, vintage, hippie look that I loved.  Thinking to myself, "I have old lace that I bought on eBay a while ago to make into napkins. You could make this."

When I got home, there in my linen box were the three pieces of lace.  Beautiful three pieces apx. 60" each piece.  So here's what I did:

Measured width of lace so that I had an end piece wide enough to sew on top. Carefully cut it out, going around the lace pattern.


I finished the edges with a serge stitch, No. 8 on my sewing machine.
Then, put the pieces together and stitched on top, again serge stitch No. 8.


Super easy, finished scarf!


So that's it for Create Space weekend project.  And it didn't cost a dime.

Happy creating!

~CJ


Sunday, March 18, 2012

Create Space #2

It's been a while between posts because I've been creating a space to get creative.  For three months, we had house guests that delayed this project, and then when I finally had the room back, it needed to be emptied, closets cleared, and furniture ordered.  Then the creating could begin.

I'm going to work backwards on this post, showing you where I'm at with my CREATE SPACE, and then will give details in future posts.  I'm just so blessed to have this space, a little time to create, and a partner who encourages and supports projects - big and small.

From the doorway into the room - my desk for sewing and blogging, lots of storage in small mason jars shelved in mini crates from Micheal's (details in future metamorphosis post).
Added a few details, but the pictures turned out dark.  I will have to learn to use my camera now that I have the room to CREATE.  Covered ironing board, made pillows and curtains (future details.)

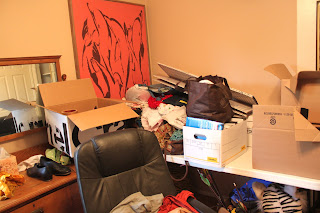
So here are a few "Before" the metamorphosis pictures I posted a month ago when the room still housed remnants of my son's furniture, school diploma, boxes of memories, and projects waiting to be created. . I'm not proud of the mess this space had became, but I'm coming out the cocoon of chaos one project at a time!


I found the "IMAGINE" "DREAM" "CREATE" word art at Michael's when buying the crates, so brought them home to spray paint when I did the crates. I have something else in mind for this wall, but for now, it works.  The rest of the room's accessories were found shopping in the house and garage.  I like this lamp with fireflys and beads around the shade. Atop the "Campaign Desk" from World Market, I thought it had an "Out of Africa" feel to it.  See my Pinterest board used for imagining this room. Way too much of an outback tangent, but it was fun to imagine a tiger covered chair in the corner.

A few "Out of Africa" ideas that never made it into the room, but were fun to imagine:
Ode to KevinGetting into a British Colonial thing.  Who knew?Reminiscent of British colonial armies and French artisan stores.Cyranso would say, "Panache."
Bohemian influencecreate, office space.  love the embroidery hoop bulletin board
Wanted a place for someone else to sit, use as an inpromtu ironing board, and a place to store a lot of fabric that will soon be a great CREATion.  Pillows and pad covered with outdoor fabric (future post.)

Pillow closeup (tutorial to follow in the future.) Loved the fabric with birds and inspirational words/phrases.
 Ironing board cover made in same fabric. If it needs to be out all the time, it should coordinate.
The Ikea Expedit shelving unit I didn't know I was putting up the same weekend the ever clever Susan Between Naps on the Porch genius was building hers inside her closet (see her post for great inspiration).  We chose two units to put side-by-side for an asymmetrical vibe. Love the wicker baskets for hiding mail-to-be-sorted, and projects-to-be-made.
Birdcage photo board, gift from my daughter-in-law, still holding favorite Christmas card photos and one new Valentine photo from my granddaughter.

When I saw this Birg Cage bulletin board, I knew I needed it desperately, so put it on my Amazon Wish List!  Happy, happy, joy, joy when I unwrapped it for my birthday.

 Sweetest Valentine ever!  Love her lots!

The other side of the room, so my creative husband can join me for projects, and then also another space that I can use to cut out fabric.  The two desks are from World Market, and have small "bread board" like extensions on either side, perfect for extra equipment, baskets, or reading.  The quilt above this desk is one I found while antiquing years and years ago.  A young man was trying to sell it to the shop owner, who wasn't overly keen on buying it.  I loved the detail, graphic design, and craftsmanship.  I motioned the eager seller outside, and asked him why he was selling it.  He said, "I have a date with a beautiful woman, but I have no money. My grandmother made this, and she told me to use it wisely." I told him I would give him a hundred dollars, and my phone number so that if he wanted to buy it back, he always could.  I've enjoyed it in my living room for years as stunning graphic fabric art, but recently updated the living room.  It will be a constant CREATE inspiration.
A little closer look.  Can you imagine the hours?  What great vision and craftsmanship.
What a joy to have a place to imagine, dream, create, and read, and write, and blog, and whatever/wherever my day takes me.  Now what I need is time, a most precious resource.
May your week be filled with small and large acts of CREATion.  From my happy place to yours, wishing you lots of St. Patty's jigs of joy!
~CJ

I'm posting on Metamorphosis Monday.  Join the party and the fun!